Residential proxies can improve the anonymity of online activities and access geographically restricted websites, so more and more users are starting to use residential proxies. So how do you make your own residential proxy? How do you do it? Here are the detailed steps for you!
What Is A Residential Proxy?
A residential proxy is a massive network of intertwined Internet Protocol (IP) addresses provided by an Internet Service Provider (ISP) that acts as an intermediary between the end user and the Internet.
When you connect to a residential proxy, it forwards your Internet requests through a real device in a specific location, masking your actual IP address and making it appear as if you are browsing from that location. These proxies allow users to use their IP address for a variety of online activities with privacy and anonymity.
Use Cases of Residential Proxies
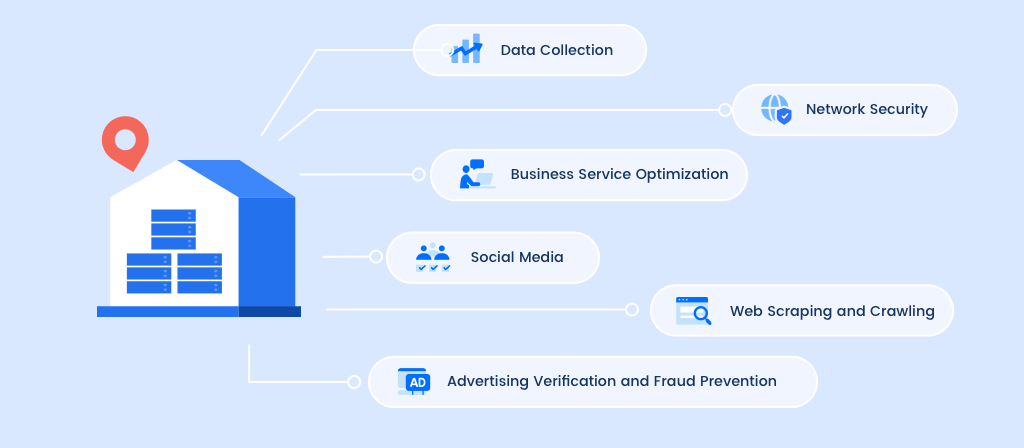
There are two main uses for residential proxies – to enhance anonymity and security or to bypass geo-blocking. In addition, residential proxies have the following uses:
1. Social Media Management
Social media is now a key marketing channel. For ease of use, businesses generally have multiple social media accounts and can switch between them at any time. This is the main role of proxies. They can help businesses manage multiple accounts and reach new audiences in different countries.
2. Global Price Monitoring
Today, many businesses attach great importance to customer satisfaction. In order to stay ahead of competitors, it is necessary to track data, monitor and comply with global price trends in a timely manner. This is where residential proxies come in. Using proxies can access global price data without any geographical restrictions.
3. Cybersecurity and Network Vulnerability Testing
Cybersecurity experts often use several strategies to check website or program vulnerabilities and the possibility of some bad actors exploiting vulnerabilities to cause damage. One of these strategies is to use residential proxies to hide the real IP address. In this way, cyber criminals can be controlled and the security and integrity of the web page or application can be maintained.
3. Data Scraping
Many companies use residential proxies to scrape valuable data from the Internet. This data includes marketing, financial, corporate and regulatory data. Since rotating residential proxies can route a company’s IP address regularly, all kinds of valuable information can be collected online.
4. Ad Verification
Media can also be effectively monitored using residential proxies. Ad verification is one such area. While browsing the internet, you may come across ads that you want to click on.
However, not all ads are real. If you install a residential proxy on your device, it will block ads for you.
5. Website Unblocking
Some web pages and apps are geo-restricted so that only people in a specific location can access them. Using a residential proxy allows you to access such websites. The proxy replaces your IP address with one that the website is familiar with, giving you unrestricted access to the website.

Why Would You Want To Make Your Own Proxy Server?
Why create your own proxy server? First, it is autonomous, allowing you to customize your settings. This is essential for businesses and individuals who require a high degree of privacy and security. By controlling your own proxy, you can ensure that the IP address is only used by yourself, thereby reducing the risk of sharing.
Second, setting up your own proxy server is more cost-effective, directly reducing the fees incurred with third-party proxy service providers. It also provides flexibility. For example, if you need to handle a large amount of data or content, you can customize your own proxy server to meet these needs.
Furthermore, self-hosted proxy servers are more secure. You can reduce sensitive data and are not vulnerable to third-party vulnerabilities.
How to Setting Up and Configuring Your Residential Proxy Infrastructure?
There are four main phases to installation and configuration, including server configuration, network setup, load balancing, authentication, and troubleshooting.
1. Configure the server:
The process of configuring a server is quite long and technical. Here are the specifics:
Set up your operating system by installing the required servers and configure them by entering the hostname and the correct time zone.
Make sure to install the required programs, such as the web server (Apache) and proxy server software (Squid or HAProxy).
Continue to create accounts with server permissions. Remember to disable the basic account. If you have a hard time disabling it, just restrict its use.
Move on to configuring the firewall to manage traffic in and out. However, you should only leave room for traffic with the correct IP address and port number to flow in and out of the proxy. Some notable firewalls worth trying include iptables and firewalld.
You may want to configure SSH by changing the default port or disabling the authentication password so that you can only log in using an SSH key.
2. Set up the network:
After configuring the server, the next step is to set up the network. Here are the specific setup steps:
Add static and dynamic IP addresses to the server you configured. Remember to configure DNS settings to prevent conflicts in hostnames.
Go to configure IP routing and make sure to enable or disable network services such as IPv6.
Resolve internal hostnames by adding ./etc/hosts. to the file. Continue to configure DNS resolver settings.
If your proxy network extends to multiple regions, it is natural to configure routing tables and set up a default gateway to facilitate traffic flow.
The selected IP server software should be installed and configured, and ports and rules should be specified as needed. Make sure to declare user authentication and access control lists (ACLs) when required.
Implement security measures by adding IP filters, limiting connections, or encrypting SSL or TLS.
3. Load balancing:
The third step is load balancing and, load balancing refers to the strategy adopted to ensure that residential proxies perform optimally in the early stages. Load balancing is necessary, especially when you have multiple servers distributed in various regions. It ensures that your proxy remains scalable even when traffic inflow and outflow increases.
Some strategies to ensure load balancing include:
Set up additional servers as your proxy network grows.
Use strategies like minimum connections to redirect traffic.
4. Authentication and Troubleshooting:
Step 4, authentication and troubleshooting, authentication focuses on who should have access to your residential proxy and who should not. While authentication manages access, it also enhances security by only allowing permitted individuals to access the proxy.
Some strategies for authenticating proxies include:
Set up a username and password system that end users must have in order to access the proxy.
Create IP whitelists to operate during specific time periods. The bottom line is to control access. IP addresses not included in the whitelist may be blacklisted by the proxy.
SSL and TLS can encrypt so that data is securely transmitted through the proxy.
In addition, when you create a proxy to enhance anonymity and bypass restrictions, you should be able to troubleshoot issues that may arise when it starts running. Here are some ways to troubleshoot:
Identify issues that may have occurred during configuration, network setup, or authentication setup, and provide solutions that end users can take to fix these issues.
You should have an online community where members can interact and possibly solve problems on their own, or have dedicated resources that users can read to solve problems.
As the proxy network develops, more and more people will set up their own proxies, and users in need can read this article carefully.

What should I check before deploying a residential proxy server?
There are two key checks that must be done before deploying a residential proxy. They include: functional and performance testing, and quality assurance testing.
1. Functional and performance testing: The IP address must be checked to see if it works as expected. One way to know if it works well is to try it on a geo-restricted website and see if it works. On the other hand, to check the performance, the download or upload speed should be optimal regardless of the location.
2. Quality assurance testing: This test can be done on IP addresses to see if they are randomly blocked on geo-locked websites. If they are, it means that their quality is poor. You may need to constantly check your code to make sure they are not compromised.
What features should my residential proxy have?
When creating a residential proxy, it may be just for yourself or a close circle. Either way, it should have the following features:
1. Automatic IP rotation
2. 24/7 troubleshooting support
3. A decent number of IP addresses in the pool.
Conclusion
With the continuous development of the Internet, residential proxies are used in more and more scenarios. Setting up your own residential proxy is not only convenient but also highly secure. This article brings you the steps and precautions for setting up a residential proxy, and provides step-by-step instructions. Users in need can come and have a look!


